Thursday, 31 May 2018

Amazon AWS S3 - 'Query in Place' & 'S3 Select' & 'Athena'

Query in Place

Amazon S3 allows customers to run sophisticated queries against data stored without the need to move data into a separate analytics platform. The ability to query this data in place on Amazon S3 can significantly increase performance and reduce cost for analytics solutions leveraging S3 as a data lake. S3 offers multiple query in place options, including S3 Select, Amazon Athena, and Amazon Redshift Spectrum, allowing you to choose one that best fits your use case. You can even use Amazon S3 Select with AWS Lambda to build serverless apps that can take advantage of the in-place processing capabilities provided by S3 Select.

S3 Select

S3 Select is an Amazon S3 feature that makes it easy to retrieve specific data from the contents of an object using simple SQL expressions without having to retrieve the entire object. You can use S3 Select to retrieve a subset of data using SQL clauses, like SELECT and WHERE, from delimited text files and JSON objects in Amazon S3.

Amazon Athena

Amazon Athena is an interactive query service that makes it easy to analyze data in Amazon S3 using standard SQL queries. Athena is serverless, so there is no infrastructure to setup or manage, and you can start analyzing data immediately. You don’t even need to load your data into Athena, it works directly with data stored in any S3 storage class. To get started, just log into the Athena Management Console, define your schema, and start querying. Amazon Athena uses Presto with full standard SQL support and works with a variety of standard data formats, including CSV, JSON, ORC, Apache Parquet and Avro. While Athena is ideal for quick, ad-hoc querying and integrates with Amazon QuickSight for easy visualization, it can also handle complex analysis, including large joins, window functions, and arrays.
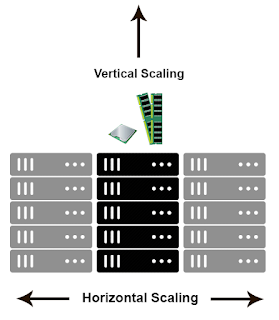
Horizontal Vs. Vertical Scaling


When demand for your application is soaring and you recognize a need to expand the app’s accessibility, power and presence, do you scale up or scale out?
In other words, is horizontal scaling or vertical scaling the right move for your business?
The heart of the difference is the approach to adding computing resources to your infrastructure. With vertical scaling (a.k.a. “scaling up”), you’re adding more power to your existing machine. In horizontal scaling (a.k.a. “scaling out”), you get the additional resources into your system by adding more machines to your network, sharing the processing and memory workload across multiple devices.
One way to look at it is to think of vertical scaling like retiring your Toyota and buying a Ferrari when you need more horsepower. With your super-fast car, you can fly at top speed with the windows down and look amazing. But, while Ferraris are awesome, they’re not very practical, they’re expensive, and at the end of the day, they can only take you so far before they’re out of gas. (Not to mention, there’s only two seats!)
Horizontal scaling gets you that added horsepower – not by ditching the Toyota for the Ferrari, but by adding another vehicle to the mix. In fact, you can think of horizontal scaling like several vehicles you can drive all at once. Maybe none of these machines is a Ferrari, but no one of them needs to be: across the fleet, you have all the horsepower you need.

Why Scaling Out Is Better Than Up

When you’re choosing between horizontal scaling and vertical scaling, you also have to consider what’s at stake when you scale up versus scale out.
In the Toyota-for-Ferrari trade-in scenario, you’re replacing a slower server with a bigger, faster one.
When you do this, though, you’re throttling yourself while the machine is taken offline for the upgrade. And, what happens down the road when your traffic is on the rise again and you have to repeat the upgrades? There are only a finite number of times you can go about solving your problem by “scaling up” in this manner.
Horizontal scaling is almost always more desirable than vertical scaling because you don’t get caught in a resource deficit. Instead of taking your server offline while you’re scaling up to a better one, horizontal scaling lets you keep your existing pool of computing resources online while adding more to what you already have. When your app is scaled horizontally, you have the benefit of elasticity.
You can do exactly this when your infrastructure is hosted in a Managed Cloud environment.
Other benefits of scaling out in a cloud environment include:
  • Instant and continuous availability
  • No limit to hardware capacity
  • Cost can be tied to use
  • You’re not stuck always paying for peak demand
  • Built-in redundancy
  • Easy to size and resize properly to your needs

How To Achieve Effective Horizontal Scaling

There are important best practices to keep in mind to make your service offering super compatible with horizontal scaling.
The first is to make your application stateless on the server side as much as possible. Any time your application has to rely on server-side tracking of what it’s doing at a given moment, that user session is tied inextricably to that particular server. If, on the other hand, all session-related specifics are stored browser-side, that session can be passed seamlessly across literally hundreds of servers. The ability to hand a single session (or thousands or millions of single sessions) across servers interchangeably is the very epitome of horizontal scaling.
The second goal to keep square in your sights is to develop your app with a service-oriented architecture. The more your app is comprised of self-contained but interacting logical blocks, the more you’ll be able to scale each of those blocks independently as your use load demands. Be sure to develop your app with independent web, application, caching and database tiers. This is critical for realizing cost savings – because without this microservice architecture, you’re going to have to scale up each component of your app to the demand levels of thservices tier getting hit the hardest.

AWS - S3 Pricing model & Different S3 models


Pricing model:

Some prices vary across Amazon S3 Regions. Billing prices are based on the location of your bucket. There is no Data Transfer charge for data transferred within an Amazon S3 Region via a COPY request. Data transferred via a COPY request between AWS Regions is charged at rates specified in the pricing section of the Amazon S3 detail page. There is no Data Transfer charge for data transferred between Amazon EC2 and Amazon S3 within the same region or for data transferred between the Amazon EC2 Northern Virginia Region and the Amazon S3 US East (Northern Virginia) Region. Data transferred between Amazon EC2 and Amazon S3 across all other regions (i.e. between the Amazon EC2 Northern California and Amazon S3 US East (Northern Virginia) is charged

S3 Glacier:
-------------

How to retrieve objects from Glacier:

To retrieve Amazon S3 data stored in Amazon Glacier, initiate a retrieval request using the Amazon S3 APIs or the Amazon S3 Management Console. The retrieval request creates a temporary copy of your data in the S3 RRS or S3 Standard-IA storage class while leaving the archived data intact in Amazon Glacier. You can specify the amount of time in days for which the temporary copy is stored in S3. You can then access your temporary copy from S3 through an Amazon S3 GET request on the archived object.

How long it takes to download object from Glacier:

When processing a retrieval job, Amazon S3 first retrieves the requested data from Amazon Glacier, and then creates a temporary copy of the requested data in S3 (which typically takes a few minutes). The access time of your request depends on the retrieval option you choose: Expedited, Standard, or Bulk retrievals. For all but the largest objects (250MB+), data accessed using Expedited retrievals are typically made available within 1-5 minutes. Objects retrieved using Standard retrievals typically complete between 3-5 hours. Bulk retrievals typically complete within 5-12 hours. 


S3 StandardS3 Standard-IAS3 One Zone-IAAmazon Glacier
Designed for Durability100.00%100.00%99.999999999%†100.00%
Designed for Availability99.99%99.90%99.50%N/A
Availability SLA99.90%99%99%N/A
Availability Zones>3>31>3
Minimum Capacity Charge per ObjectN/A128KB*128KB*N/A
Minimum Storage Duration ChargeN/A30 days30 days90 days
Retrieval FeeN/Aper GB retrievedper GB retrievedper GB retrieved**
First Byte Latencymillisecondsmillisecondsmillisecondsselect minutes or hours***
Storage TypeObjectObjectObjectObject

Wednesday, 30 May 2018

Availability vs Durability

Durability should address the question: "Will my Data still be there in the future?" whereas Availability should address the question: "Can i access my Data right now?".

================================================================

Durability can be described a the probability that you will eventually be able to get your object back from the storage system from one of the stores and archives.


Availability is the probability that you will be able to get it back the moment that you ask for it.

================================================================

Durability is that your files exist on the storage of a probability of 99.999999999%, however availability is that your files are still there on the storage but your probability of accessing them or retrieving them back is 99.99%, could be due to a connection issue to reach the service, however the files are there guaranteed at 99.999999999%

Monday, 28 May 2018

create user and schema MySQL

navigate to this folder - /usr/local/mysql/bin

Login using : mysql -uroot -ppassword

Then create new User and Schema using below commands:

CREATE USER transport@'%' IDENTIFIED BY 'transport';
GRANT ALL PRIVILEGES ON * . * TO 'transport'@'%';

CREATE SCHEMA IF NOT EXISTS transport;
GRANT ALL ON transport.* TO 'transport'@'%';


Then login back using mysql -utransport -ptransport

To see the port on which mysql is running : SHOW GLOBAL VARIABLES LIKE 'PORT';

caching_sha2_password - troubleshoot

error:

Authentication plugin 'caching_sha2_password' cannot be loaded: dlopen(/usr/local/mysql/lib/plugin/caching_sha2_password.so, 2): image not found


solution:

ALTER USER 'yourusername'@'localhost' IDENTIFIED WITH mysql_native_password BY 'youpassword';

Tuesday, 1 May 2018

get current date time in YYYYMMddHHmmss format

DateTimeFormatter formatter = DateTimeFormatter.ofPattern("YYYYMMddHHmmss");
return LocalDateTime.now().format(formatter);